+1 716 309 2066+1 815 664 3282

Manual vs AI Digitizing: Cost, Quality, and Production Results

Cheap auto digitizing software causes constant thread breaks and massive machine downtime. Discover exactly why commercial print shops demand true manual digitizing for perfectly clean daily production runs.

Typical cost per design

AI Digitizing
$5–$10 per file (auto-processing, no human review)
Manual Digitizing
$15 to $25 Fixed Price at Sassy Digitizing ($20–$75 for large jacket backs)

First-run production success

AI Digitizing
40–60% on complex or stretch-fabric designs
Manual Digitizing
99%+: density, underlay and compensation set by hand

Turnaround time

AI Digitizing
Minutes (automated processing)
Manual Digitizing
2–4 hours on weekdays (manual craft; free 1–2 hour rush for simple designs)

Pull compensation

AI Digitizing
Applies automatic settings. Often set incorrectly
Manual Digitizing
Set per element, per fabric and per stitch span

Underlay type

AI Digitizing
Uses a blanket underlay setting for all elements
Manual Digitizing
Correct underlay type selected for each element

Small text handling

AI Digitizing
Auto-generates column widths: often too wide for small text
Manual Digitizing
Hand-built column stitches at minimum viable width

Cap stitch settings

AI Digitizing
Ignores curved-surface requirements
Manual Digitizing
Configured for curved cap surface specifically

Stitch sequencing

AI Digitizing
Automated: often inefficient with long jumps
Manual Digitizing
Planned for production efficiency: minimal jumps

Thread break rate

AI Digitizing
High on thin fabrics and complex designs
Manual Digitizing
Very low: density and tension set correctly

Source file included

AI Digitizing
No source file included typically
Manual Digitizing
EMB source file available on every order

Revisions after production failure

AI Digitizing
Charged as a new order
Manual Digitizing
Free small revisions until you're satisfied
Manual digitizing ensures higher quality, fewer thread breaks, and better results on complex designs

Manual Digitizing vs AI-Digitizing

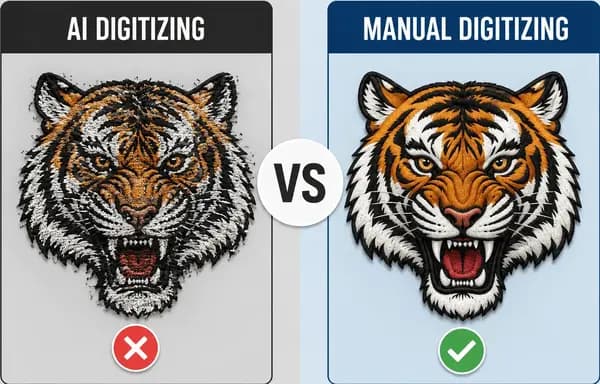
Auto-digitizing software often shortchanges it. It is often cheap and it is often wrong. Manual digitizing solves the problems auto-digitizing creates before they reach your machine.

Auto Digitizing (AI): What You Get

Fast but inconsistent

  • Quickly generates designs using algorithm-based shape detection
  • Produces acceptable results only for simple large-fill designs
  • No proper fabric-specific underlay control
  • Incorrect pull compensation across stitch spans
  • Small text column widths become distorted and unreadable
  • Struggles with complex production requirements and detailing
⚠️ Struggles with complex production

Manual Digitizing: What You Get

Precise and production reliable

  • Every stitch path is built manually by a skilled digitizer
  • Underlay and pull compensation controlled per element
  • Fully configured for specific fabric type
  • Built for real production conditions, not preview-only output
  • Stitches aligned to exact production requirements
  • Free small revisions until you're satisfied
✓ Built for your production environment

Key Technical Differences

Manual digitizing addresses critical production factors that auto-digitizing software cannot handle

Pull Compensation

Manual digitizing accounts for pull compensation on every element by adjusting stitch width to compensate for fabric tension during stitching. Auto-digitizing applies the same pull compensation to every element regardless of its position, size or stitch direction, and then lets the fabric pull as it stitches up.

See small letter digitizing

Ordered Stitching

Manual digitizing plans the stitching order to minimize unnecessary jump stitches and thread changes. This reduces production time and thread waste on every run. Auto-digitizing does not plan stitching order: it processes elements in input order.

Stitch Sequencing

Manual digitizing sequences stitches for efficient production. Underlay goes in first, then fills, then satin elements, then fine detail. This sequence prevents earlier stitches from being pushed aside by later ones. Auto-digitizing software applies the same stitch sequence to every design.

Small Text Handling

Small text below 6mm is the most common failure point in auto-digitized files. Correct column widths for each letterform must be set individually. Our digitizers hand-build every character in small text using minimum viable column widths that keep strokes open and legible at production.

Small lettering digitizing service

Why professional shops choose manual digitizing

Production-Ready Files
No Production Failures
Expert Digitizers
100% Manual
Manually digitized embroidery file built in Wilcom with precise stitch paths, correct underlay, and production-ready results guaranteed to run clean

Why Manual Digitizing Wins

Manual digitizing delivers precise stitch paths, correct underlay, and production-ready results that run clean on the first sew-out. Auto-digitized files frequently fail with incorrect density, missing underlay, and unreadable small text, costing your shop time, garments, and production downtime. Every file from Sassy Digitizing is built by hand in Wilcom and covered by our free small revisions until you're satisfied if a digitizing error slips through.

  • ✓Correct Underlay Every Time: Set per element and per fabric, not a single blanket setting.
  • ✓Clean Stitch Sequencing: Underlay, fills and satin elements run in the right order to avoid distortion.
  • ✓Readable Small Text: Column widths hand-built for legibility down to 3mm, not auto-generated.
  • ✓Every Machine Format: DST, PES, EMB and more, matched to your machine at no extra cost.
Start Expert Digitizing

Cheap Auto-Digitizing Creates Thread Breaks, Puckering, and Poor Sewouts

See why commercial embroidery shops trust manual digitizing for cleaner production, better stitch flow, and professional embroidery quality.

2–4 hour delivery Free revisions Pay after approval
Create Free Account

Frequently Asked Questions

Everything you need to know about our embroidery digitizing service, pricing, file formats, turnaround times and revision policy.

What is the difference between manual and AI embroidery digitizing?

Manual embroidery digitizing is the process of a skilled digitizer building every stitch path by hand in professional software such as Wilcom V9 and E2. The digitizer controls underlay type, density settings, pull compensation, stitch direction and color sequence for every design element individually based on fabric type and garment construction. AI or auto-digitizing uses software algorithms to generate stitch paths automatically from an image input with no human control or customization. Auto-digitized files typically have incorrect density settings, no proper underlay structure, and poor small-text rendering which causes production failures, thread breaks and garment distortion during embroidery.

Why do auto-digitized files cause thread breaks?

Auto-digitized files cause thread breaks primarily because of incorrect stitch density and missing or improper underlay structure. Auto-digitizing software applies uniform density settings across all design elements without accounting for fabric type, garment stretch properties, or individual element size and shape. This causes thread piling and fabric puckering on thin fabrics like performance wear and insufficient stabilization on structured fabrics like twill and canvas. Manual digitizers set density and underlay type individually for each design element based on the specific fabric combination, ensuring stable production runs without thread breaks or registration failures.

Can auto-digitizing software produce acceptable results?

Auto-digitizing may produce acceptable results only for very simple, large fill areas in low-detail designs embroidered on stable medium-weight woven fabrics where production quality tolerance is low and thread breaks are acceptable. For any design with small text under 6mm height, fine detail work, complex color transitions, 3D puff elements, applique sections, or production on stretch fabrics, performance wear, or lightweight materials, manual digitizing is required for reliable production results. Commercial embroidery shops running daily production cannot afford the downtime and waste caused by auto-digitized files.

Does Sassy Digitizing use any auto-digitizing software?

No. Every design digitized at Sassy Digitizing is built 100% by hand in Wilcom V9 and E2 professional digitizing software by one of our 38 expert digitizers with an average of 8 years experience each. We do not use auto-digitizing features, auto fonts, automated lettering tools or any automated stitch generation on any order regardless of price point or design complexity. All underlay, density, pull compensation and stitch pathing is set manually by a human digitizer who understands fabric behavior and production requirements.

How much does manual digitizing cost compared to auto-digitizing?

Manual embroidery digitizing at Sassy Digitizing starts at $15-$25 for standard designs, which is only $5 to $10 more than most auto-digitizing services that charge $5 to $10 per file. However, the cost difference is recovered immediately when you factor in zero thread breaks, no production downtime, no wasted garments, and no need to reorder files. Auto-digitized files often require paid revisions or complete re-digitizing after production failures. Manual digitizing includes free small revisions until you're satisfied, making it significantly more cost-effective for commercial production environments.

What is an AI digitizer?

An AI digitizer, also called auto-digitizing software, turns an image into stitches automatically. It is fast and cheap, but it guesses stitch direction, density and underlay, so logos with small text or fine detail often stitch badly. Manual digitizing means a person builds every stitch path for your fabric and garment.