







The Ultimate Guide to Cap Embroidery Digitizing: How to Fix Off-Center Logos, Thread Breaks, Puckering, and Distortions
Embroidery on caps is widely considered one of the most challenging tasks in the commercial embroidery industry. Unlike flat garments such as t-shirts, hoodies, or polo shirts, cap fronts present a unique set of mechanical and structural hurdles. Curved surfaces, heavy center seams, stiff buckram backing, dynamic fabric movement, and flagging can transform a perfect artwork design into an off-center, puckered, or distorted stitch out.
Whether you run a commercial digitizing house or operate multi-head embroidery machines, mastering cap embroidery requires an in-depth understanding of garment physics, pathing order, underlay strategies, pull compensation, and machine mechanics.
In this comprehensive guide, we will break down the real root causes behind common cap embroidery failures and provide actionable technical solutions to elevate your quality to industry-leading standards.
1. Why Your Cap Embroidery Is Off-Center: The Real Root Cause and Technical Fixes
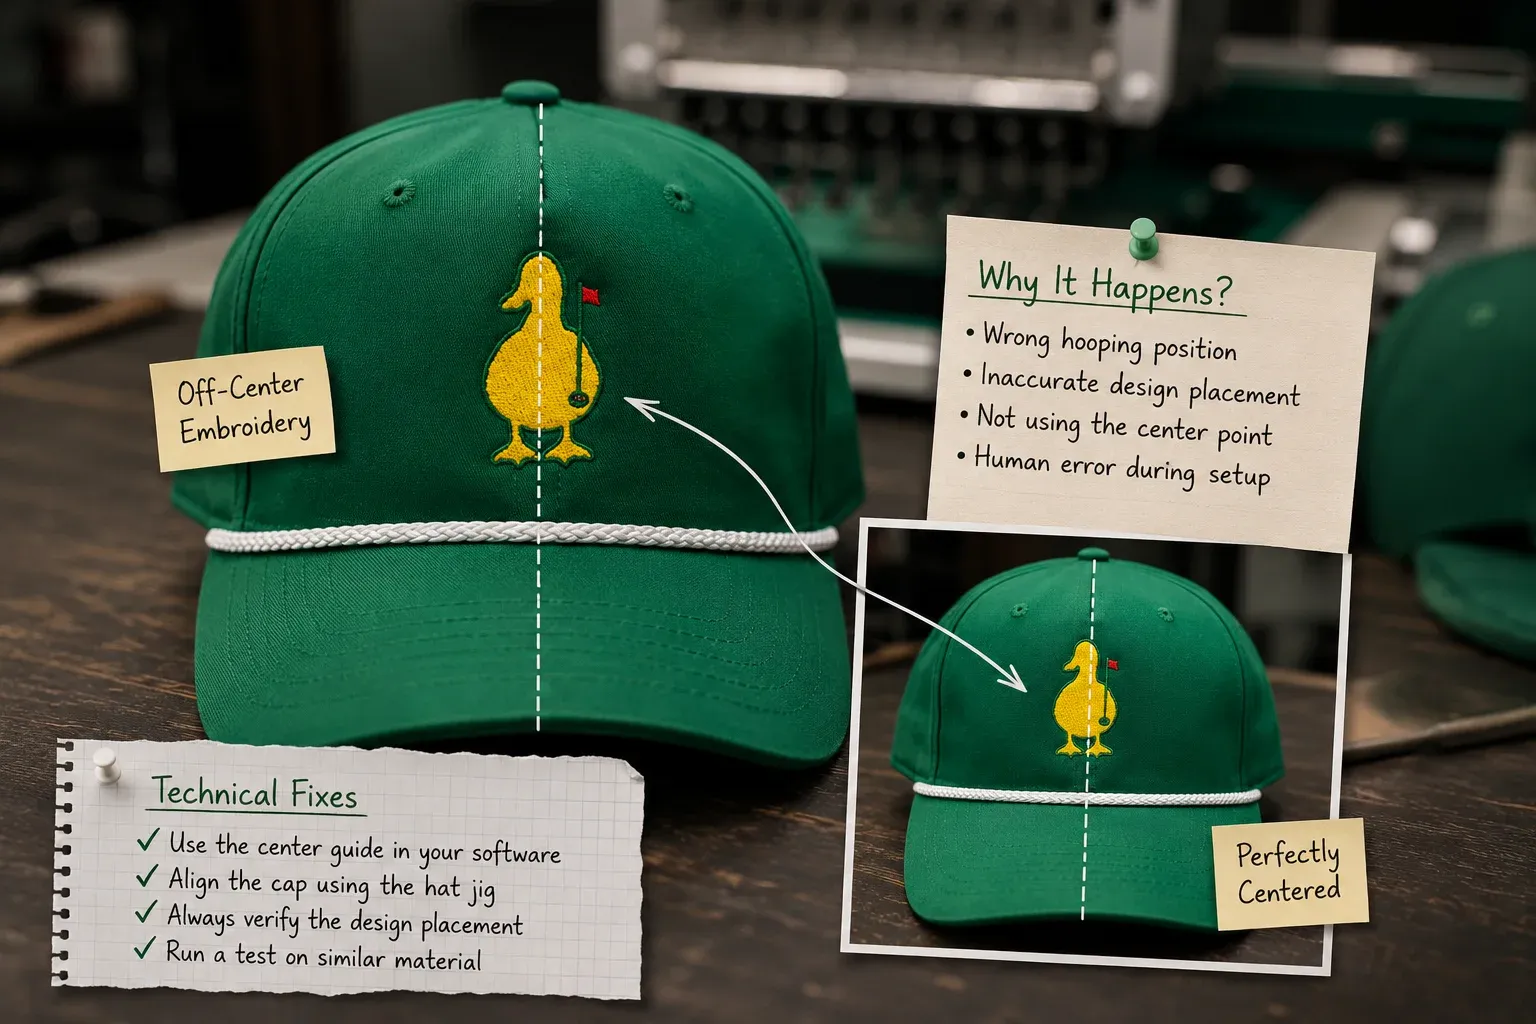
One of the most frustrating issues machine operators face is spending hours setting up a job only to find the finished logo shifted 2 to 5 millimeters to the left or right of the center seam.
The Root Cause: Rotational Torque & Slippage
When embroidery machines operate on a cap frame driver, the cap moves in a cylindrical rotation (rotational axis) while the needle bar moves horizontally (linear X/Y axis). Because a cap driver grips the cap around its sweatband and brim, the forces generated during high-speed sewing create rotational torque.
If your pathing starts from one side and sews across to the other (e.g., Left-to-Right), the fabric is pushed across the cap's curved crown. This action stretches the fabric toward the end of the design, causing the visual center of the logo to shift away from the center seam.
Technical Fixes:
Always Digitize Center-Out: Path your design starting at the vertical seam, moving outward to the left, and then outward to the right. This distributes push forces symmetrically across both halves of the cap frame.
Proper Framing Tension: Ensure the cap is framed tightly with uniform tension along the sweatband strap. Any slack at the bottom band allows the cap to twist mid-sew.
Lock-Stitch Anchoring: Start your design with secure tacking or locking stitches directly along the center seam to anchor the cap fabric to the backing before stitching heavy elements.
2. How to Stop Cap Embroidery Puckering and Thread Breaks on Curved Surfaces
Puckering and thread breaks on cap fronts usually stem from a lack of stabilization and severe friction between the needle, thread, and stiff cap materials.
The Root Cause: Dynamic Drag & Needle Heat
As the needle penetrates a curved surface, the dynamic drag against stiff fabric (or heavy buckram) causes the fabric to ripple rather than stay flat. High dynamic drag creates uneven surface tension, leading to fabric ripples and visible gaps in fills. Furthermore, friction increases exponentially on curved planes, building heat along the needle shaft, causing thread shredding, frequent thread breaks, and needle deflection.
Technical Fixes:
Optimize Density: Avoid density settings intended for flat garments. For caps, lower satin and fill densities by 10% to 15% (e.g., use a stitch spacing of 0.42 mm to 0.45 mm instead of 0.38 mm). Over-densifying forces excess thread into a tight arc, guaranteeing puckering.
Backing Selection: Use heavy-weight tearaway (typically 2.5 oz to 3.0 oz cap backing) formulated specifically for cap drivers. Cap backing provides continuous radial support along the curve.
Needle Choice: Switch to structured needles such as SAN 6 or DBxK5 (Size 75/11 or 80/12) with a sharp/ballpoint hybrid tip (SES). Titanium-coated needles reduce friction-induced heat, significantly cutting down thread breaks.
3. Structured vs. Unstructured Caps: How Fabric Construction Changes Digitizing Settings
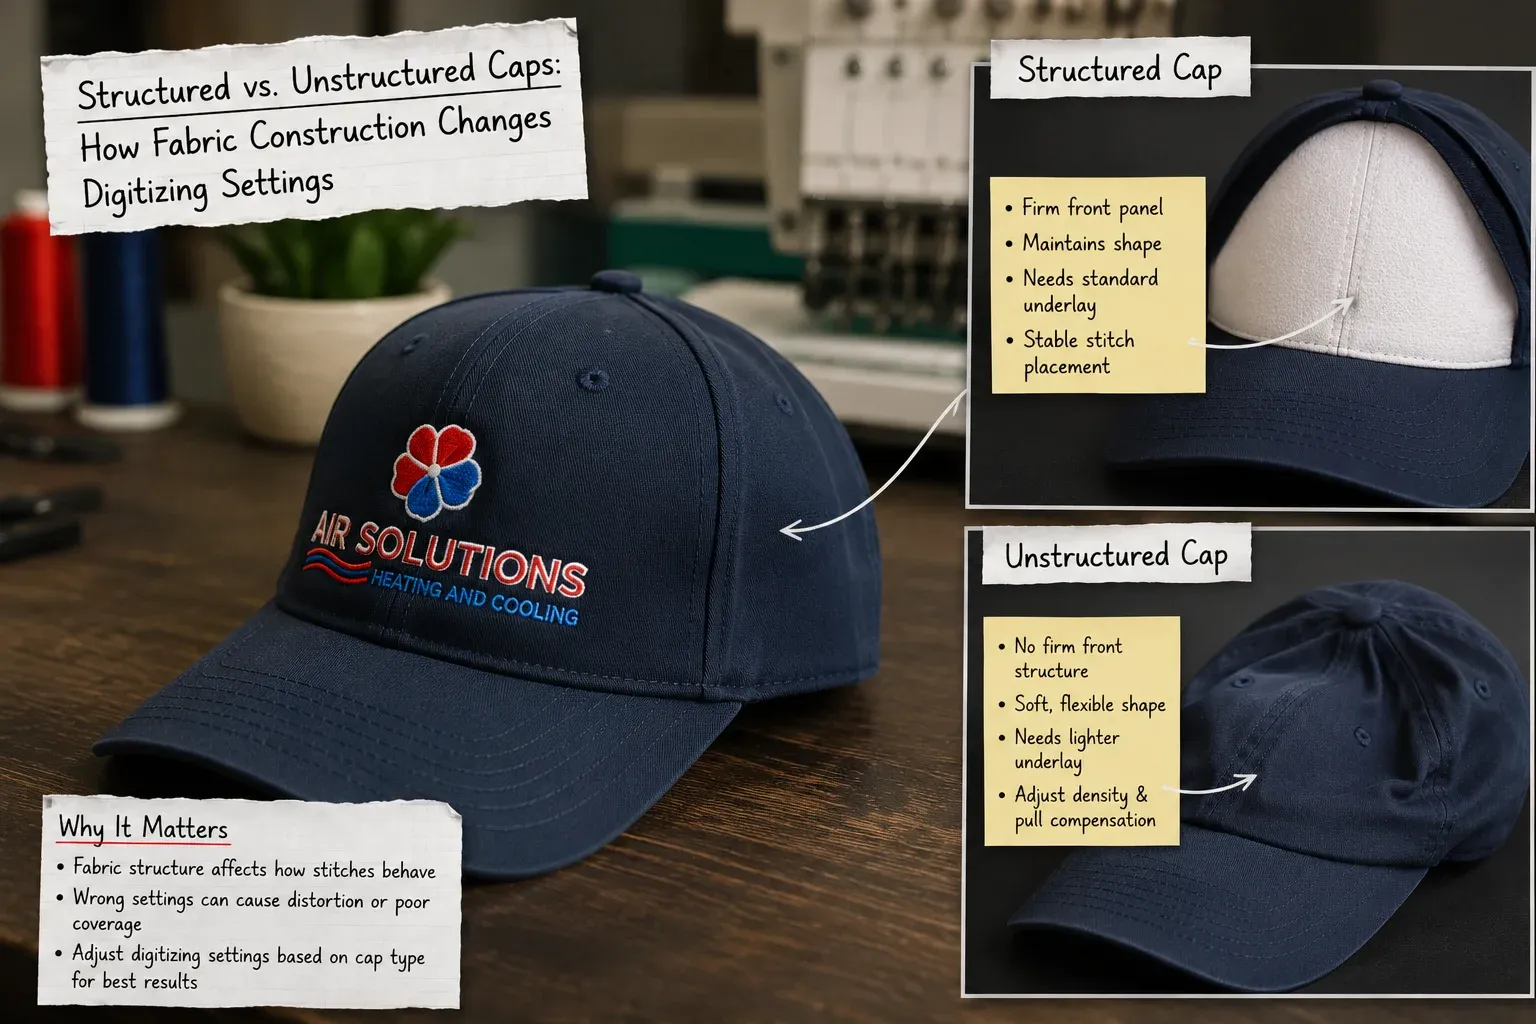
A common mistake in digitizing is using the exact same embroidery file for both structured (rigid) and unstructured (floppy/dad cap) hats.
| Feature / Setting | Structured Caps (e.g., Richardson 112) | Unstructured Caps (e.g., Dad Hats) |
|---|---|---|
| Front Panel Construction | Heavy buckram lining keeps the front panels stiff and self-supporting. | Soft cotton twill, canvas, or washed fabric with no internal stiffener. |
| Pull Compensation | Standard (+0.20 mm to +0.30 mm). | High (+0.35 mm to +0.50 mm) to absorb fabric stretch. |
| Underlay Strategy | Light edge walk or light center walk. | Heavy grid / tatami / double-zigzag underlay to create a stable foundation. |
| Stitch Density | Standard cap density (0.40 mm – 0.42 mm spacing). | Slightly lower density (0.42 mm – 0.45 mm) to prevent punching holes through unsupported fabric. |
Key Takeaway:
When digitizing for unstructured caps, your underlay must act as the "missing buckram." Build a solid framework using mesh/grid underlay to stabilize the soft fabric before running top stitches.
4. Why Micro Text on Caps Becomes Unreadable and How to Fix Density and Lettering
Small text (under 5 mm or 0.2 inches) on caps often ends up buried in the fabric, distorted, or completely unreadable due to thread sink and seam interference.
Technical Rules for Small Text on Caps:
Minimum Column Width: Never digitize a letter column thinner than 1.0 mm (preferably 1.2 mm). Thin satin stitches lack the structural width to bridge cap fabric weaves. Widen columns to prevent push/pull collapse.
Underlay Selection: Use a single Center-Walk Underlay for small lettering to provide a base support without allowing thread to bury into the seam. Avoid edge walk underlay on micro text, as it will stick out past the narrow satin column edges.
Density Tuning: Open up density. Set your stitch spacing between 0.42 mm and 0.48 mm (ideally 0.45 mm). Packing stitches too tightly forces small loops together into an illegible blob.
Lettering Height: Keep small text at least 5 mm tall. Anything smaller should be converted to a fine 60-weight thread setup paired with a smaller needle size (65/9).
5. The Secret to Clean 3D Puff Embroidery on Caps Without Foam Peeking Through

3D foam embroidery elevates cap designs, but visible foam peeking through satin borders or messy corners ruins the high-end look.
The 3D Puff Checklist:
Increase Density by 50%–100%: Standard satin density will not cover EVA foam. If your normal satin density is 0.40 mm, increase it to 0.20 mm – 0.22 mm spacing over foam areas.
Cap the Ends (Corner Capping): Open satin ends allow foam to pop out. Digitized paths must include sharp triangular "capping" stitches or tapered points to slice the foam cleanly at edges and corners.
Use the Right Foam Hardness: High-density 2 mm to 3 mm EVA foam cuts cleanly under high-density stitching. Soft craft foam tears unevenly, leaving fuzzy edges.
Never Use Underlay Over Foam: Underlay stitches will crush the foam before the top satin sews out, destroying the raised 3D effect. Apply underlay only on flat sections around the foam.
Clean Finishing: Use a heat gun (carefully) after stitching to shrink back any micro-bits of foam protruding through the edges.
6. How to Eliminate Registration Errors and Gaps in Cap Frame Embroidery
Registration errors—where outlines do not line up with solid fills—happen far more frequently on cap drivers than on flat hoops.
The Cause: Unsynchronized Fabric Push/Pull
As an embroidery head sews a large fill region, it pulls fabric toward the inside of the shape along the stitch angle and pushes fabric out at the open ends. On a curved surface, this movement is amplified, causing the outline to sew onto bare fabric instead of touching the fill edge.
The Solutions:
Same-Direction Pathing: Sew elements and their outlines in the same sequence without long delays between them. Don't stitch all background fills first and come back 10,000 stitches later to do outlines.
Overlap Outlines: Extend your fill regions 0.4 mm to 0.6 mm underneath outline satin borders. This safety zone guarantees no gaps show even if the cap shifts slightly under tension.
Lock the Outline to the Fill Angle: Avoid placing outline stitch directions completely perpendicular to the underlying fill direction if the fabric is unstable.
7. Center-Out vs. Bottom-Up Pathing: The Right Digitizing Order for Cap Fronts
Sequencing (pathing) determines whether a cap design sews smoothly or fails mid-run. Two primary pathing rules dictate success: Center-Out and Bottom-Up.
Why Combined Center-Out / Bottom-Up Pathing Works:
Pushes Waves Away from the Brim: Sewing from the bottom band (near the visor) upward toward the crown pushes excess fabric up and away. If you sew from top to bottom, fabric bunches up at the rigid cap seam where the visor meets the crown, creating unfixable bubbles.
Prevents Distortion Across the Vertical Seam: Sewing from the center seam outward ensures that equal tension is applied to both left and right panels.
Ideal Cap Pathing Sequence:
Step 1: Lower-center underlay / anchoring stitches along the center seam (Bottom Anchor).
Step 2: Center-bottom elements moving upward and outward on the right side.
Step 3: Move upward and outward on the left side toward the top of the cap crown.
8. Why Cap Logos Distort During Stitch Out and How Pull Compensation Solves It
Every time a needle penetrates fabric, the thread pulls the material inward along the stitch axis (Pull Effect) and pushes fabric outward perpendicular to the stitch axis (Push Effect). Because a cap is wrapped around a cylinder under radial tension, pull forces are significantly stronger than on flat items.
Tuning Pull Compensation for Caps:
Standard Pull Compensation: For flat garments, pull compensation is typically set around 0.15 mm to 0.20 mm.
Cap Pull Compensation: For cap fronts, pull compensation should be raised to 0.30 mm – 0.40 mm on satin columns.
Wide Satin Columns: Very wide satins (above 6 mm) require even more compensation (+0.45 mm) because thread tension pulls fabric inward much harder across wide gaps.
Circle Distortion: A digitized perfect circle will sew out as an oval on a cap if pull compensation isn't applied correctly. Over-compensate along the pull axis and under-compensate along the push axis to achieve a true geometric circle on the finished hat.
9. How to Choose the Right Underlay for Cap Digitizing to Prevent Garment Shift
Underlay is the foundation of any digitized file. On caps, its primary job is not just holding up stitches, but tacking the outer fabric to the inner buckram and backing.
| Element Type | Primary Underlay | Secondary Underlay |
|---|---|---|
| Narrow Satins | Center-Walk | None |
| Medium / Wide Satins | Edge-Walk | Zig-Zag |
| Large Fills | Tatami / Mesh Grid | Edge-Walk Outline |
| Micro Text | Center-Walk (Light) | None |
Best Practices for Cap Underlay:
Grid / Tatami Underlay for Fills: Always run an open-grid or light Tatami underlay at a 90-degree angle to your main fill angle. This locks down the curved fabric grid.
Double-Edge Walk for Satins: On wide satin lettering, a double-edge walk underlay creates two parallel rails that raise the top satin stitches off the cap surface, preventing the center of the column from sinking into the seam.
Keep Underlays Inset: Ensure underlay paths are set 0.3 mm to 0.4 mm inside the final stitch border so they never peak out from beneath the top stitches during fabric movement.
10. Fixing Cap Embroidery Flagging: How Presser Foot Height and Tension Settings Save Your Design
Flagging occurs when the cap fabric rises up along the needle bar during retraction, creating vertical bounce during high-speed sewing. This unstable vertical movement causes skipped stitches, loops, birdnesting, and severe thread breakage.
How to Eliminate Flagging:
1. Presser Foot Height Adjustment
Set your machine's presser foot slightly lower than you would for flat garments. The presser foot should firmly hold the cap fabric down against the needle plate at the lowest point of the stroke without leaving pressure marks (shining) on delicate caps.
2. Thread Tension Balancing
Caps require tight, well-balanced thread tension:
Bobbin Tension: Ensure bobbin tension is set correctly using a gauge (typically 22–25 grams for cap sewing).
Top Thread Tension: Keep top tension slightly firmer than flat settings (110–130 grams). Loose top thread combined with cap bounce results in immediate thread loops on top of your design.
3. Cap Driver Maintenance & Clearance
Verify that your cap frame driver is correctly aligned with the needle plate. Ensure there is less than 1 mm of play between the driver ring and the machine arm. Excessive mechanical slack in the driver assembly translates directly into fabric bounce and lost registration.
Practical Checklist for Cap Production
Before sending your next cap design to the production floor, review this quick technical checklist:
Is the design pathing Center-Out and Bottom-Up?
Is pull compensation increased to at least 0.30 mm – 0.40 mm?
Have you lowered overall top stitch density by 10–15% to prevent stiffness and puckering?
Are small texts using Center-Walk underlay only with column widths of 1.0 mm+?
Have you chosen the correct needle (75/11 or 80/12 SAN 6 / SES) for stiff cap crowns?
Is your presser foot height set to press firmly against the curved surface to stop flagging?
Frequently Asked Questions (FAQs)
1. Can I use the same digitizing file for flat shirts and caps?
No. Flat garment files are pathed for two-way fabric movement on a flat plane. They lack the required pull compensation (0.30 mm to 0.40 mm), center-out pathing order, and specialized underlay structures needed to stabilize fabric over a curved 270-degree cap frame.
2. Why does my cap embroidery shift to the right side during stitching?
This usually occurs when a file is digitized using left-to-right pathing instead of center-out pathing. As the multi-needle head sews across the crown, it pushes a wave of fabric ahead of the needle. By the time it reaches the right side, the fabric has shifted, causing off-center logos and misaligned registration.
3. What needle size and type is best for structured caps?
The optimal choice for structured caps is a Size 75/11 or 80/12 SAN 6 / DBxK5 needle with a sharp or light ballpoint (SES) tip. Titanium-coated sharp needles slice cleanly through dense buckram and center seam tape without deflecting or heating up under high friction.
4. How do I prevent foam from showing through 3D puff cap embroidery?
To achieve crisp 3D puff embroidery, increase your satin stitch density by 50% to 100% (using a 0.20 mm to 0.22 mm stitch spacing), digitize sharp capping stitches at open column ends to cut the foam cleanly, and never apply underlay over the foam area.
5. Why does small lettering on caps fill up and look messy?
Small text on caps becomes unreadable when digitizers use standard density settings or apply heavy edge-walk underlays. For text under 5 mm, use a single Center-Walk underlay, set column widths to a minimum of 1.0 mm, open up density spacing to 0.42 mm–0.48 mm, or switch to 60-weight thread with a 65/9 needle.
Keith Blair
Senior Quality Control (HOD)
As the Head of Quality Control at Sassy Digitizing, Keith brings over 12 years of hands-on commercial embroidery experience to the table. He is our resident problem-solver, specializing in the technical nuances of stitch density, pull compensation, and complex digitizing. When he's not establishing quality standards for 3D puff and appliqué, you'll find him perfecting the art of small lettering to ensure every stitch counts.
Expertise:
Related Articles

Beginner’s Guide to Small Lettering & Monogram Digitizing: Precision, Density, and Pathing Secrets
Learn how to digitize crisp, readable micro-text and monograms down to 3 mm with this complete technical guide. From adj…

Beginner’s Guide to Jacket Back Digitizing: Everything You Need to Know
Learn the fundamentals of large-format jacket back digitizing with this complete beginner's guide. From managing push-pu…

Beginner’s Guide to Left Chest Logo Digitizing: Everything You Need to Know
Learn the fundamentals of left chest logo digitizing with this complete beginner's guide. From understanding size constr…